

As most of you know, due to the fact that I tend to bring it up in conversation rather often, I am rather interested in interior design. In fact, I will be going back to school this fall to study interior design. That's right, everyone else in my family has gone back to school to get their master's degrees and PhDs, and I'm going back to get, not even a second bachelor's, but an associate's degree. I actually would try to get a second bachelor's in design if there were a school anywhere nearby that offered the degree, but except for the Art Institute in Draper which is SUPER expensive, the only university with an interior design program in Utah is in Logan, which is almost a two hour drive from my house. So, that's not gonna happen!
Anyway, my point here is that I'm going to start writing a few posts about a subject I'm very interested in. I say "interested in" rather than "knowledgeable about", because right now, all my experience on the subject comes from watching way to much HGTV and obsessively reading "house blogs". But I've decided that as I pick up on some interesting tips on the subject, I might as well pass them on. Also, I will include bits and pieces of the little projects I'm doing as I try to turn my new undecorated house into a cozy, lovely home.
My first real project in this house was sewing the curtains for my front living room! I have approximately twenty windows in my new house, and they have all been naked for the entire nine months we have lived here. We did put some blinds in the girls rooms, which face the street, and some shades in the master bath, which faces the neighbor's house, for privacy, but no fabric, no color, no LIFE has found its way into our rooms and onto our walls before now. My dear mother gave me a lovely new sewing machine as a housewarming gift, and I finally broke it in a couple of months ago with my first home decor project. Ta-da!
I found the main fabric at a nice little home decor fabric store that was unfortunately going out of business and fell in love with it, especially because it was 75% off! It seemed to have all the colors that I wanted: it was white, which I thought would brighten up the room, with brown and green leafy vines and red and blue flowers. I thought it matched our old blue sofas, which is kind of tricky to do, while adding some fun new colors. However, I hadn't measured the height of the ceiling, and just guessed on how much to get, and of course, I ended up short. Never fear, I later found a ruffly navy blue fabric to add a bit of a border and fill up the extra space. I actually wish now that I had made the blue part bigger, but oh well! Here's how they turned out:

I'm fairly happy with them! I do plan on adding some bamboo roman shades and trim around the windows eventually. But in addition to my amazing skills as a seamstress (I'm hoping you all don't notice how one of the panels is several inches shorter than the others), I also wanted to share with you this cool little trick I just learned to make your plain curtain panels resemble custom-made pleated drapes. It's great if you make your own curtains, or just have some store-bought panels that you want to spruce up a little. I bought some curtain clips for these curtains to minimize the complexity of the project, and originally just had them clipped across the edge of the fabric. However, I was never really happy with the way the fabric hung. It looked sloppy and unfinished.
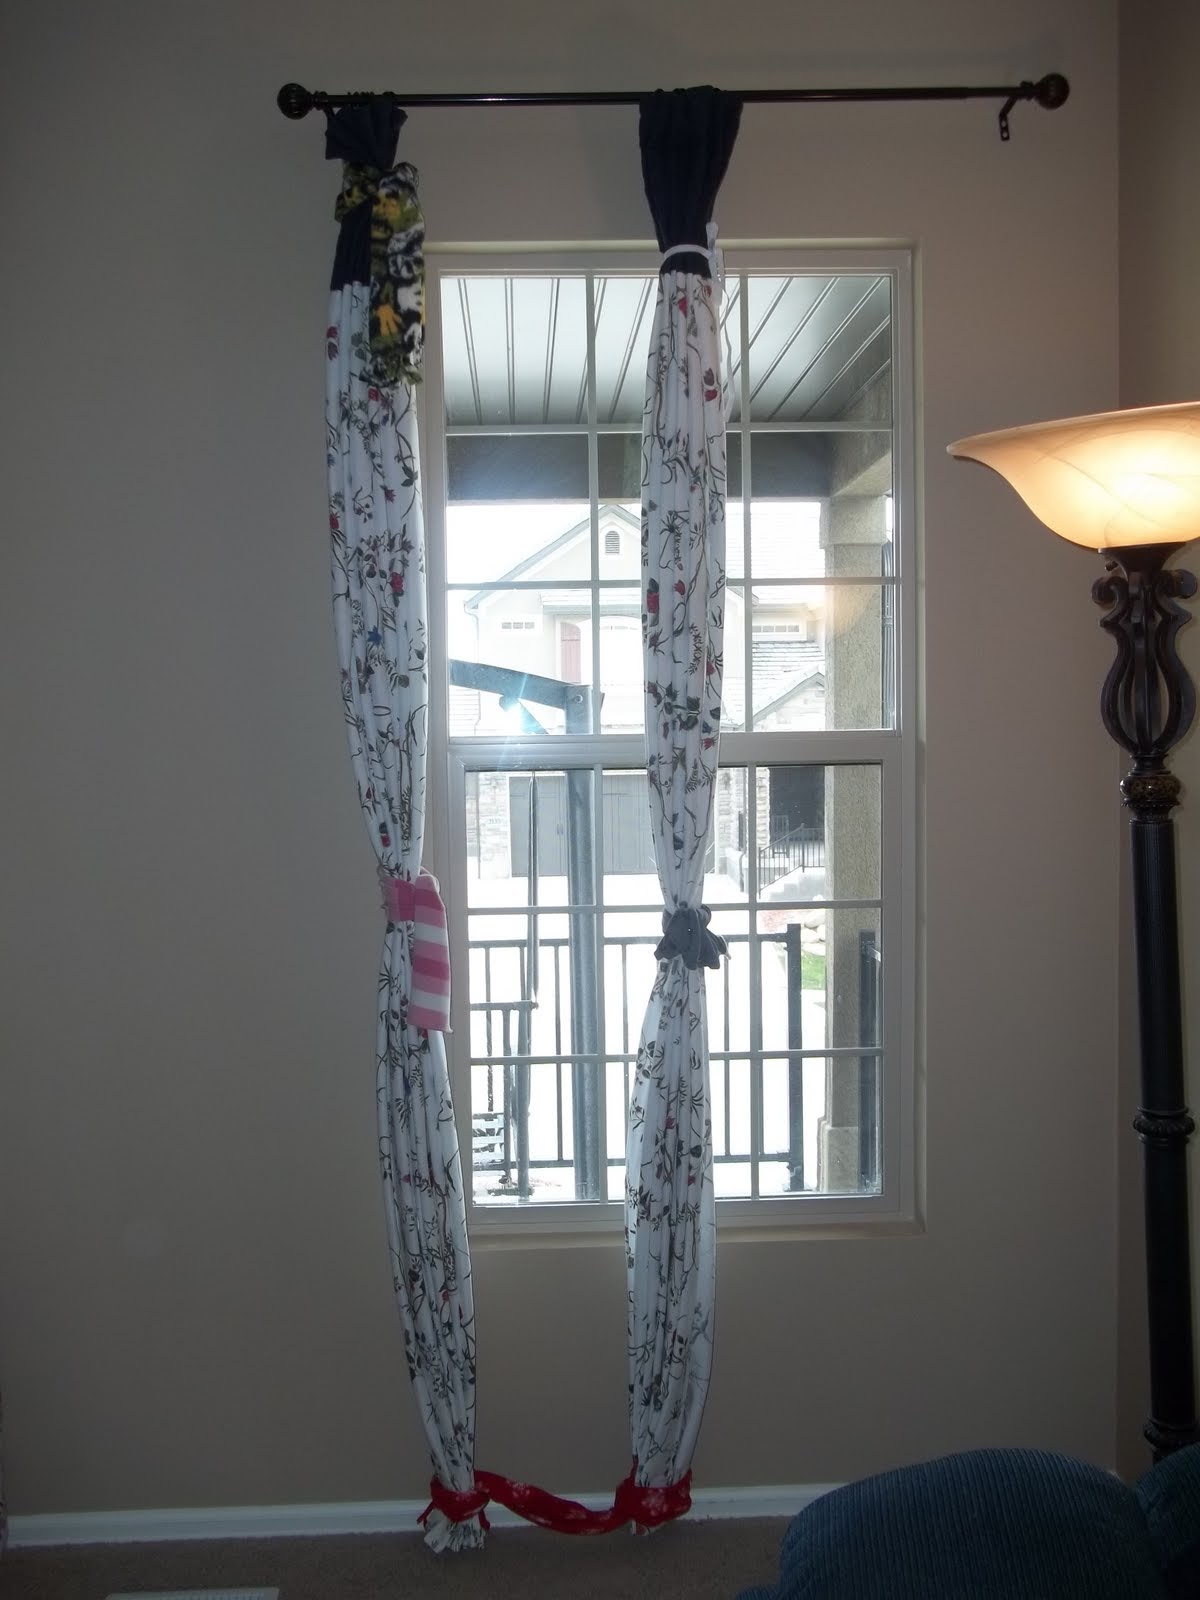
This is how I had the clips before:

and this is how the curtain looked before:

Notice how you can see the clips hanging from the rings and how the fabric kind of billows out at the bottom. Not too attractive. But so easy to fix once you know how!
1. Start by laying your panel on the floor with the wrong (back) side facing up. Measure the width of your panel and place the clips at even intervals. My fabric was about 48" wide, and I had six clips, so I put them about eight inches apart.

2. Pinch the fabric vertically where you want to place the clip, about two to three inches from the top of the curtain. If you place the clip too close to the top of the fabric, your pleats will flop over. This picture actually shows the clips a little too close to the edge, as I later found out. I had to bring them all down another inch or so after I hung them. Make sure as you clip the pinched fabric that you keep the edge of the fabric straight, as if folded, or your pleat will be lopsided. Also, don't try to clip too much fabric. You don't want it all bunched up. Just clip as much fabric as will comfortably fit in the jaws of the clip.

3. Hang your curtain on its rod. Pull the fabric in-between the rings forward to create your pleats.

It should look something like this as this point:

4. Gather your pleats together. I put a finger in between each pleat to hold it in place and then pinched them together, then I ran my fingers down the first foot or two of the fabric to continue the pleats further down. Keep the pleats stacked evenly on top (well, on the side) of each other, like a paper fan.

5. When you have the top third or so neatly arranged to your liking, take a scarf, ribbon, yarn, whatever, and tie it around the fabric to hold the pleats in place. Don't tie it so tight that it bunches the fabric or you will get wrinkles. I found that tying the knot on the flat side, rather than the front, helped avoid that problem. When you are done, it should look like this:

6. Do the same thing for the rest of the fabric, stacking the pleats side to side for the full length of the fabric. Tie as needed to keep the pleats in place. My fabric flared out at the bottom quite a bit, so I secured it right at the bottom as well. Cute, huh? I think I used every scarf in the house!
7. Use a fabric steamer or an iron with a steam setting and steam the curtains from top to bottom. Mine has a "steam blast" button that worked fairly well.
 Leave the curtains like this for several hours or overnight. (If you don't have any kind of steamer, just leave the curtains tied up for longer, maybe 24 hours.) When you remove the ties, your curtains should retain their pleats for quite some time. If you need to refresh them, just tie them up and steam them again. Not only is your entire curtain now hanging in nice straight folds, but the top is fuller and prettier and the ugly clips on the rings are hidden.
 |
| BEFORE |
 |
| AFTER |

cute idea - they look great!
ReplyDeleteHi Emily Cummings here-They look great. I too blog on decorating, but I wouldn't say I'm knowledgeable either it's just my trial and error. I'm at www.cummingsesgoings.blogspot.com I am in desperate need of tips/opinions if you'd like check it out I'd love to hear your opinion.
ReplyDelete